Develop PHP on WSL2 in 2023
Three years after my previous article on the subject, it's time to look at how different the process is now.
Three years
In the last three years many things changed:
- The WSL2 went production.
- The Windows OS got a new version (11), and it has an amazing WSL2 support.
- The Docker also shipped a better WSL integration.
- The PHPStorm IDE with the latest update made it easy and fun to work with WSL and Docker.
- Microsoft released the Windows Terminal, and it’s a must-have jack of all trades terminal emulator.
A clean start
I prefer to do a clean installation to avoid all the trash we piled up during our previous experiments. But that’s the most optimistic way.
Windows
Although it’s possible to use WSL2 on Windows 10, I would say if you can, please upgrade to Windows 11. It’s worth,
because of the much better integration and feature-support. So preferably you have a clean installation of Windows 11
(Build 22000 or higher). Use the winver command in cmd.exe to check yours.
Applications
Against all the requirements of different official and non-official websites, you don’t need to install git, php,
ruby and most of the other development stuffs onto Windows. You will use them from inside WSL.
WSL2
You can also install it from Windows PowerShell, but I would recommend to install it from the
Microsoft Store, because there - for some unknown reasons - they ship new features faster
than into the command line repository. One such painfully missed new and awesome feature is the systemd support.
When you install it, and choose the Linux distribution to use, I recommend to use Ubuntu. The only reason is it has an
insane level of support, and as I experienced, most of the know-hows and issue solving topics on Stackoverflow
in the Linux subject are belong to Ubuntu.
Whenever the process asks you for a username and password to give, don’t go crazy, it’s a sandbox playground, you won’t
host it as a webserver (hopefully). So just take it easy and give something easy to type. I gave my name gabor, but
you can do anything, for example dev as I did it three years ago. Give username and password the same. Not super secure,
but only you will use it.
Docker Desktop
Lately, there are initiatives to keep Docker within WSL. Personally I am great supporter of this idea, but right now it seems to be very hacky. I would wait until it’s officially supported, so for now, please install the infamously big and resource-hungry Docker Desktop.
Windows Terminal
First there was the CMD.EXE. Later we got the Windows PowerShell. But to be honest, anybody, who took a bit seriously
the web development, never used these, and installed alternative command line emulators instead. But now, we have the
Windows Terminal that can integrate any other terminals. By default, the CMD and PowerShell
are there, but after installing the WSL you will automatically get the “Ubuntu” option from the dropdown list. And this
is exactly what we need.
PHPStorm
There is a big group in the developer community who take their vote on the VSCode. Personally I didn’t find it to fit my expectations after using PHPStorm for a decade. “But VSCode is free” - that’s what they used to say. Yes, it’s true. On the other hand you can get PHPStorm for free too (4 3 2, HAHAHA!), if you apply for the Open Source License. But if you don’t qualify for this license, that 10$/month won’t make anybody homeless. I bet you pay more on video streaming, don’t you?
Fine tune
After you have all the necessary applications, let’s make them work together.
Docker Desktop
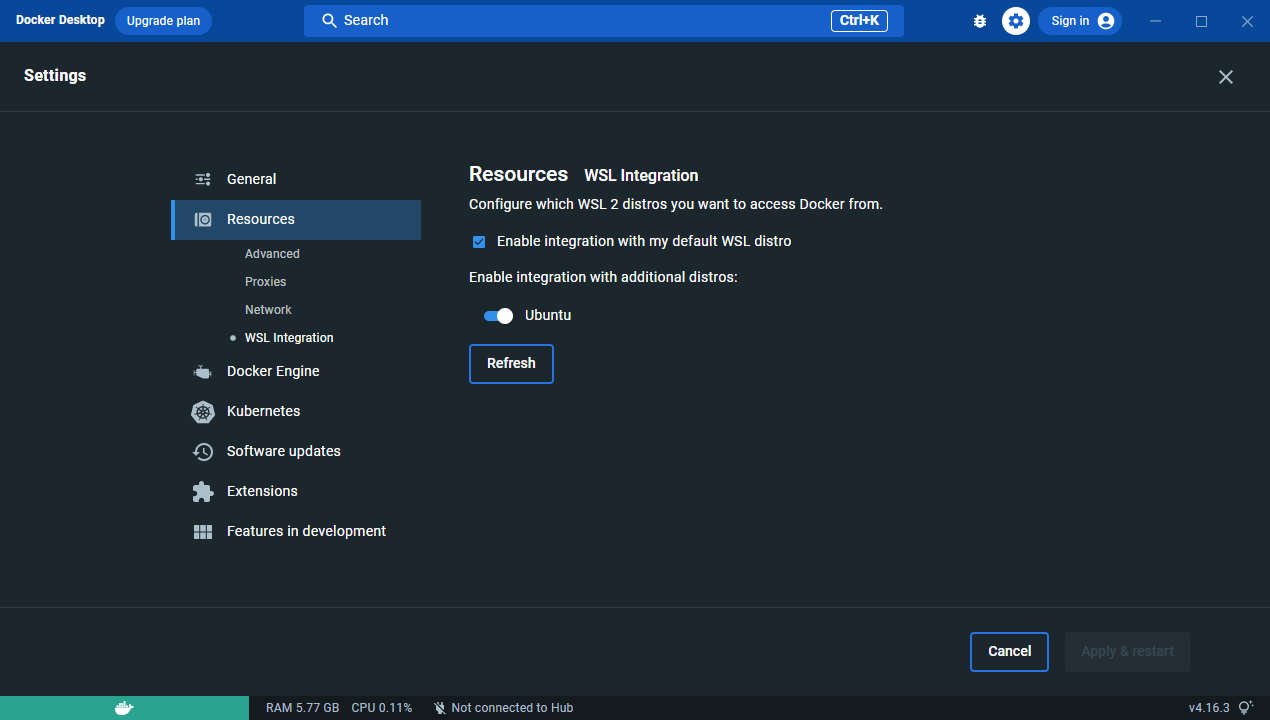
First, take the Docker Desktop and make it available for the WSL2. To do that, open the application, and on the top
right (next to the “Sign in”/Profile) click on the cogwheel to get to the Settings. There, click on the Resources and
the WSL Integration options. Enable the WSL integration and choose the Linux distro you have (Ubuntu).
Windows Terminal
When you first open the Windows Terminal, you will get the CMD as default terminal. Next to the actual tab, there’s a
dropdown menu, where you can open other terminals. Choose Ubuntu to get to the WSL. if it’s the first time opening the
WSL terminal, it may take some time as it has to boot up. But it’s fast.
Personally I’d like to store my Projects in a separate place, so I recommend to do the following:
1
2


                cd
mkdir Projects
Now, from the terminal’s dropdown menu, select the Settings, and in the Startup menu, change the default profile to Ubuntu.
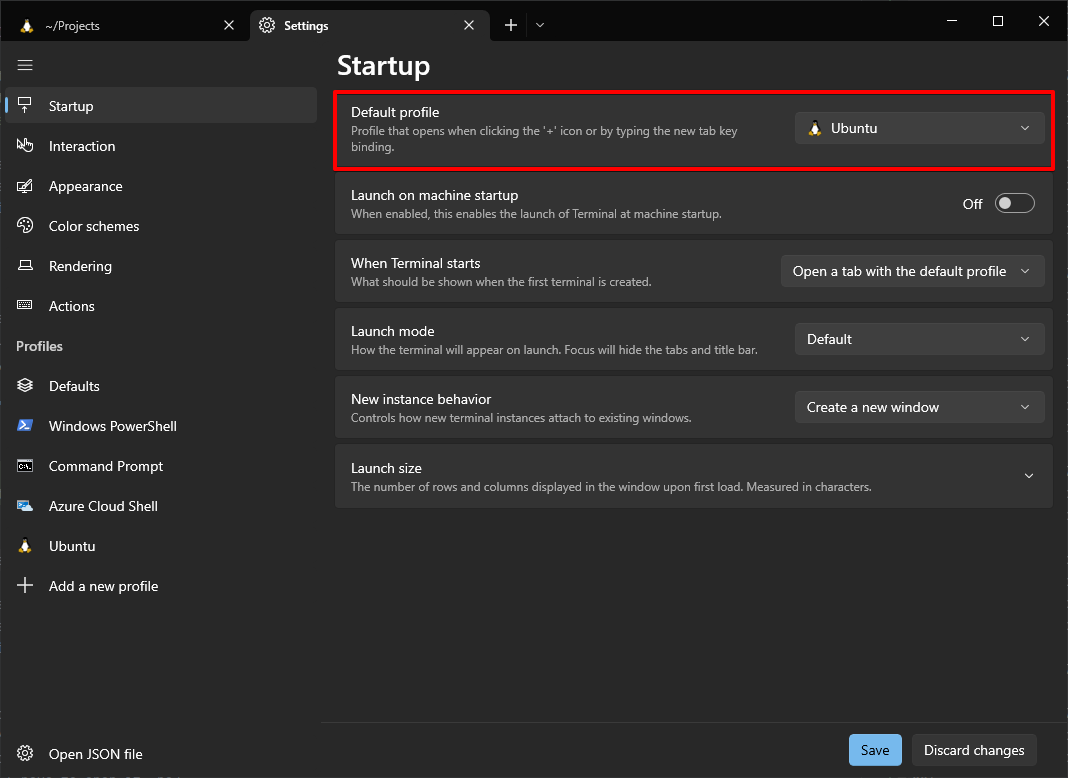
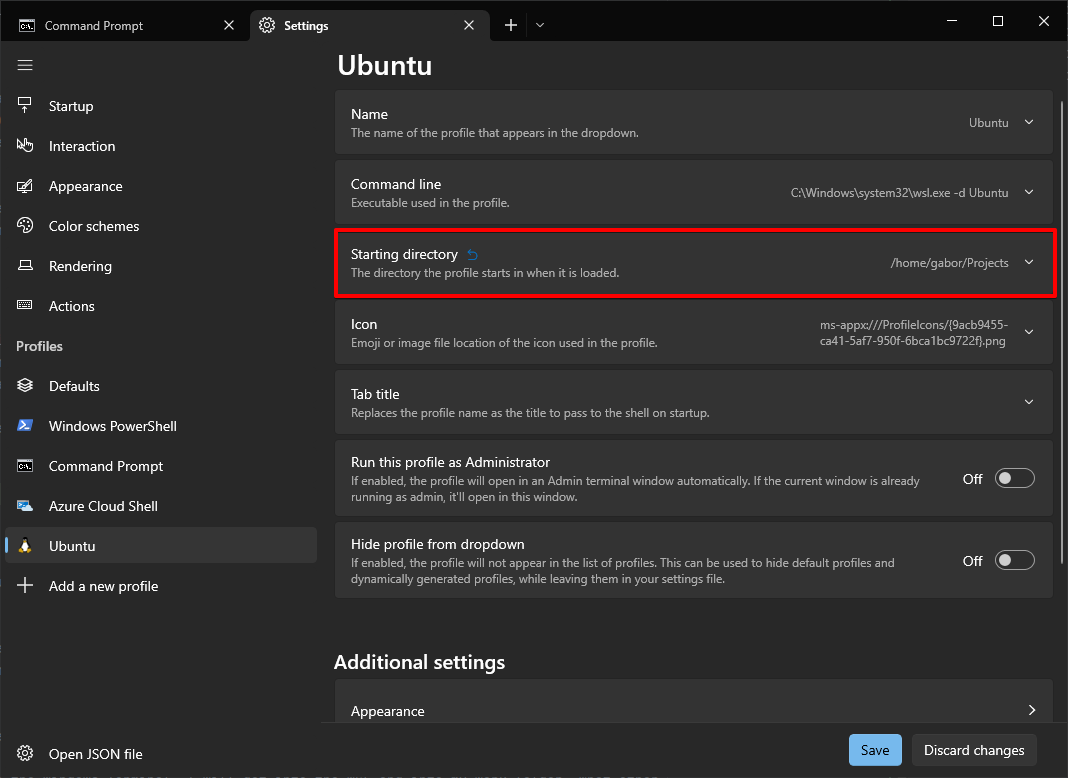
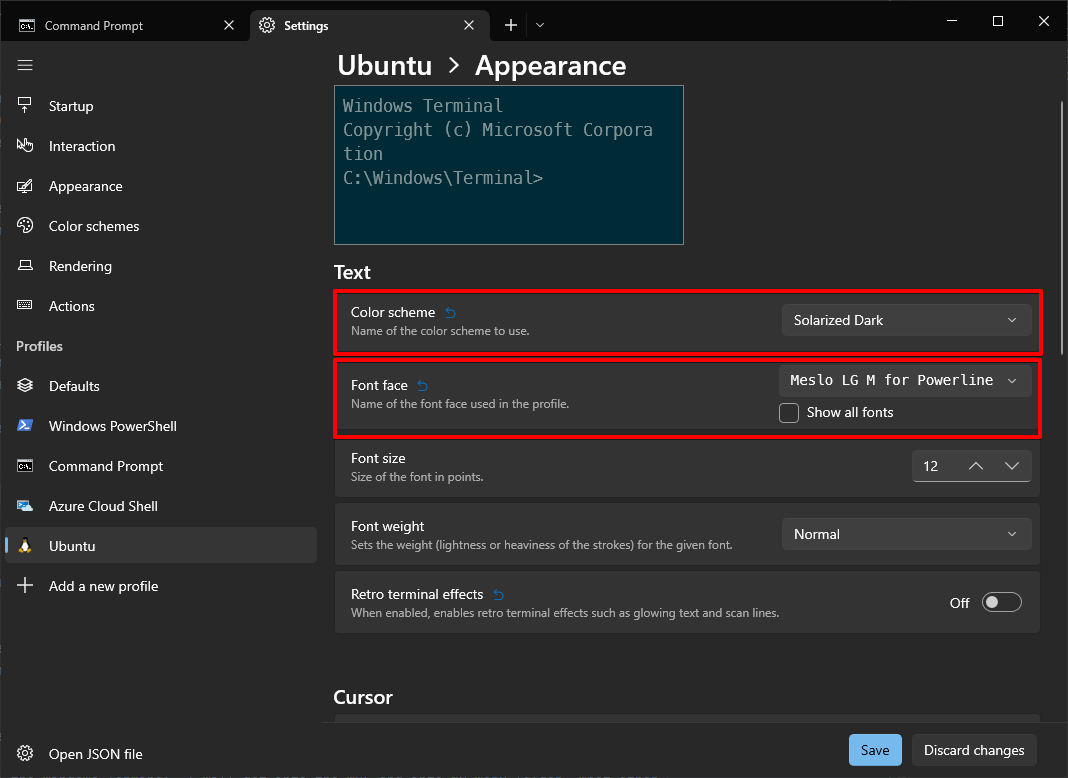
You can customize your Ubuntu profile as much as you want, this application is very flexible, so give a virtual hug
to whatever Microsoft team developed this. One big plus is you can set your default starting directory. I set it to my
Projects folder, so whenever I open the Windows Terminal, I will get into the WSL and into my work folder. What other
reason would I have to open it, no?
You can change the theme as well, my personal favourite is the Solarized Dark with the Meslo Nerd Font.
WSL
Well, this is a bigger leap. The base state of the WSL (Ubuntu) is just a fresh clean installation, nothing is customized there. So the first thing to do is update:
1
2
3


    sudo apt-get update
sudo apt-get -y upgrade
sudo apt-get -y dist-upgrade
Install some packages you may need
There are some commonly used packages which are not necessarily shipped with the WSL’s Ubuntu by default. So just to make sure everything will work as expected, do a safety check and run this command:
1
2
3
4
5
6


    sudo apt-get -y install git unzip zsh curl build-essential \
ca-certificates sqlite3 software-properties-common \
lsb-release apt-transport-https python3 python3-pip

sudo apt update
sudo apt install dbg
Install Oh my zsh
Yes, sh is good, bash is better, but if you want an all-inclusive experience, I recommend to install the Oh my zsh
shell. It has some benefits that will come in handy.
1


    sh -c "$(curl -fsSL https://raw.githubusercontent.com/ohmyzsh/ohmyzsh/master/tools/install.sh)"
Install the Powerlevel10k theme
Open the WSL and run the following commands:
1
2


    git clone --depth=1 https://github.com/romkatv/powerlevel10k.git ~/powerlevel10k
echo 'source ~/powerlevel10k/powerlevel10k.zsh-theme' >>~/.zshrc
Now open the ~/.zshrc file in any editor you prefer and make sure the following line is set:
1


    ZSH_THEME="powerlevel10k/powerlevel10k"
If it’s there, it’s time to do some customization. Run the following command:
1


    p10k configure
This will guide you through some setup questions.
After finishing the setup, if you find the prompt too long, for example you see your username, or you are deep in the directory tree and the prompt gets overflow, you can still fix it.

Open again the ~/.zshrc file with an editor and add the following:
1


    prompt_context() {}
This will wipe out the unnecessary user information from the prompt. Now open the ~/.p10k.zsh file and look for the
following settings and change their values:
1
2
3


    POWERLEVEL9K_SHORTEN_STRATEGY=default
POWERLEVEL9K_SHORTEN_DELIMITER='\u2026'
POWERLEVEL9K_SHORTEN_DIR_LENGTH=2
Save the files, then close and reopen the terminal to apply the changes:

Install the latest NodeJS
If you ask yourself, “Why do I have to install anything into WSL, when I will use Docker?”, you are more or less right. The answer is simple: Because there are some cases when it’s better to have it locally. Especially when you work with an IDE like the PHPStorm which has a bunch of inspection tools running in the background.
1
2


    curl https://raw.githubusercontent.com/creationix/nvm/master/install.sh | bash
nvm install node
If the nvm install node command fails, you need to close and reopen the terminal window and try again.
NOTE: after the NodeJS installation the poweline10k prompt may start to show the node/nvm/npm version. If it disturbs you,
you can remove it by editing the ~/.p10k.zsh file and look for the POWERLEVEL9K_RIGHT_PROMPT_ELEMENTS setting. Just
comment out or delete everything you don’t need there.
Verify the installation with:
1
2
3


    nvm --version
node --version
npm --version
Install PHP with some packages
PHP alone may come in handy any time, so it has a better reason to install it into the WSL than the NodeJS had. To do so, just run the following:
1
2
3
4


    sudo add-apt-repository ppa:ondrej/php # Press enter when prompted.
sudo apt update
sudo apt install -y php8.2
sudo apt install -y php8.2-{bcmath,bz2,cgi,cli,common,curl,fpm,fpm-dbgsym,gd,intl,ldap,mbstring,mysql,opcache,pdo,pgsql,soap,sqlite3,xdebug,xml,zip}
Verify the installation with:
1
2


    php -v
php -m
Switch between installed PHP versions
You may end up with multiple PHP installations on your WSL. If you don’t see the version that you need, you can check and switch between the installed versions with the following command.
1


    sudo update-alternatives --config php
Install Composer with some packages
It’s also a good idea to install the Composer globally on WSL along with some code quality packages, so PHPStorm can
easily use them.
1
2
3
4


    curl -sS https://getcomposer.org/installer -o /tmp/composer-setup.php
HASH=`curl -sS https://composer.github.io/installer.sig`
php -r "if (hash_file('SHA384', '/tmp/composer-setup.php') === '$HASH') { echo 'Installer verified'; } else { echo 'Installer corrupt'; unlink('composer-setup.php'); } echo PHP_EOL;"
sudo php /tmp/composer-setup.php --install-dir=/usr/local/bin --filename=composer
Verify the installation with:
1


    composer -V
Now it’s time to add the quality tools:
1
2
3
4
5


    composer global require "squizlabs/php_codesniffer"
composer global require "friendsofphp/php-cs-fixer"
composer global require "phpmd/phpmd"
composer global require "phpstan/phpstan"
composer global require "vimeo/psalm"
PHPStorm
After we installed all the necessary tools onto WSL, we can easily configure our beloved IDE.
Set up the default PHP Interpreter
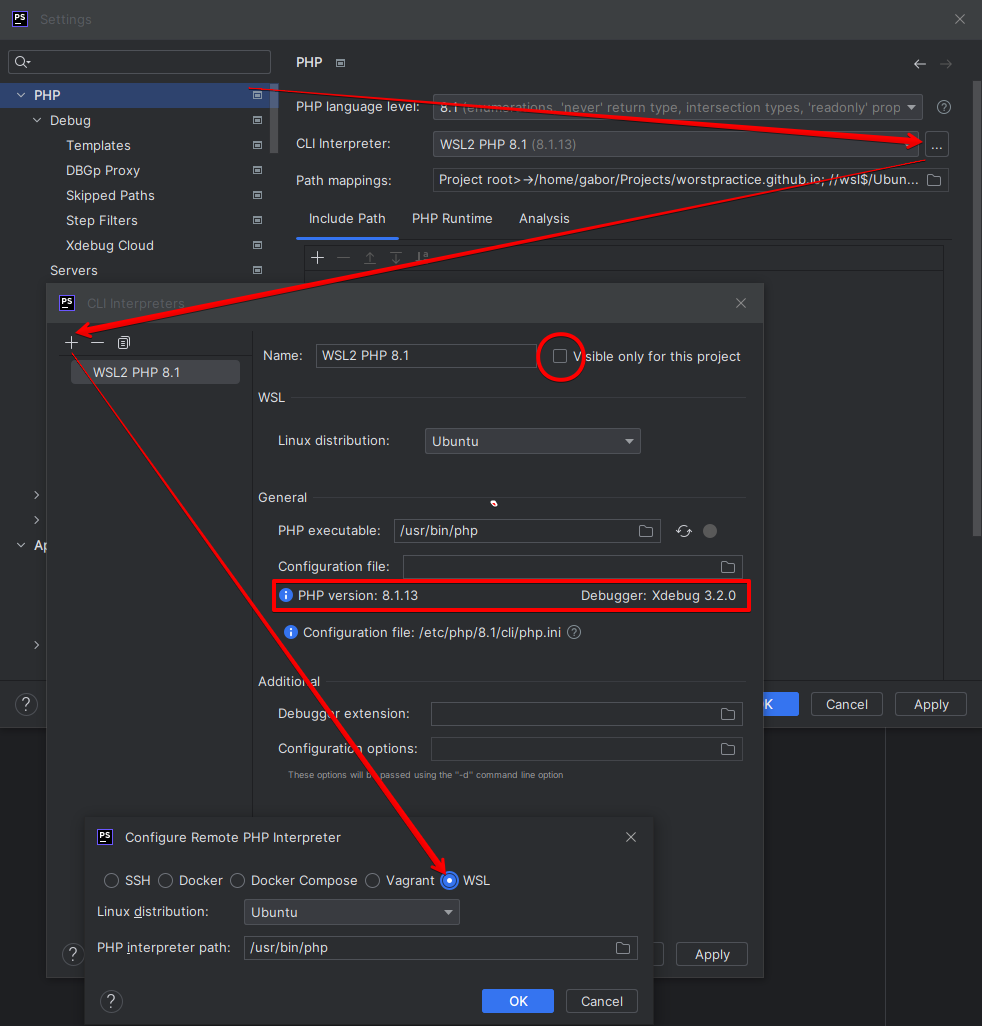
Because of my work, I have only PHP 8.1 installed on my computer, so some screenshots may confuse you. But the same works for PHP 8.2 too. Now this is what you need to do:
- Open up the PHPStorm settings.
- Choose the PHP option, and then on the other end of the
CLI Interpreterpart press the...button. - Press the
+button and choose theFrom Docker, Vagrant, VM, WSL, Remote...option. - Select the WSL option, and from the dropdown, select
Ubuntu, then pressOK. - Set a name, that you can identify.
- Uncheck the
Visible only for this projectoption, since this will be the default interpreter. - In the
Generalfield you should see the PHP and Xdebug versions that you installed on the WSL
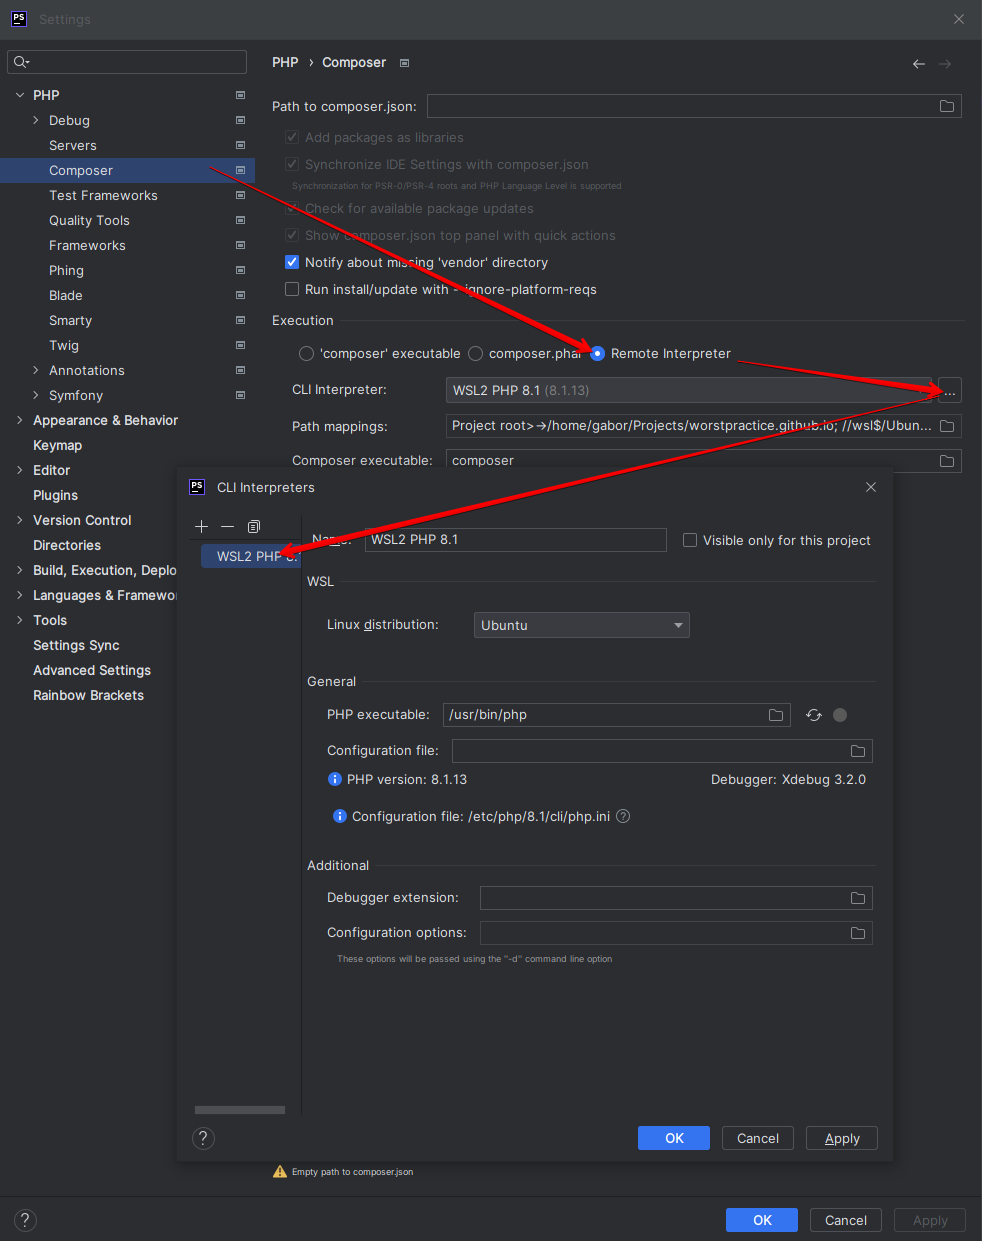
Set up the composer
The next step is to set the composer. Of course, we will set the WSL’s global composer package manager that we installed
earlier. The setup is easy: just pop up the Settings > PHP > Composer and on the Execution fieldset choose the
Remote Interpreter option, then from the CLI Interpreter dropdown choose the previously created WSL interpreter.
When for some reason it wouldn’t list it (happened once to me), you can still click on the ... button to configure it.
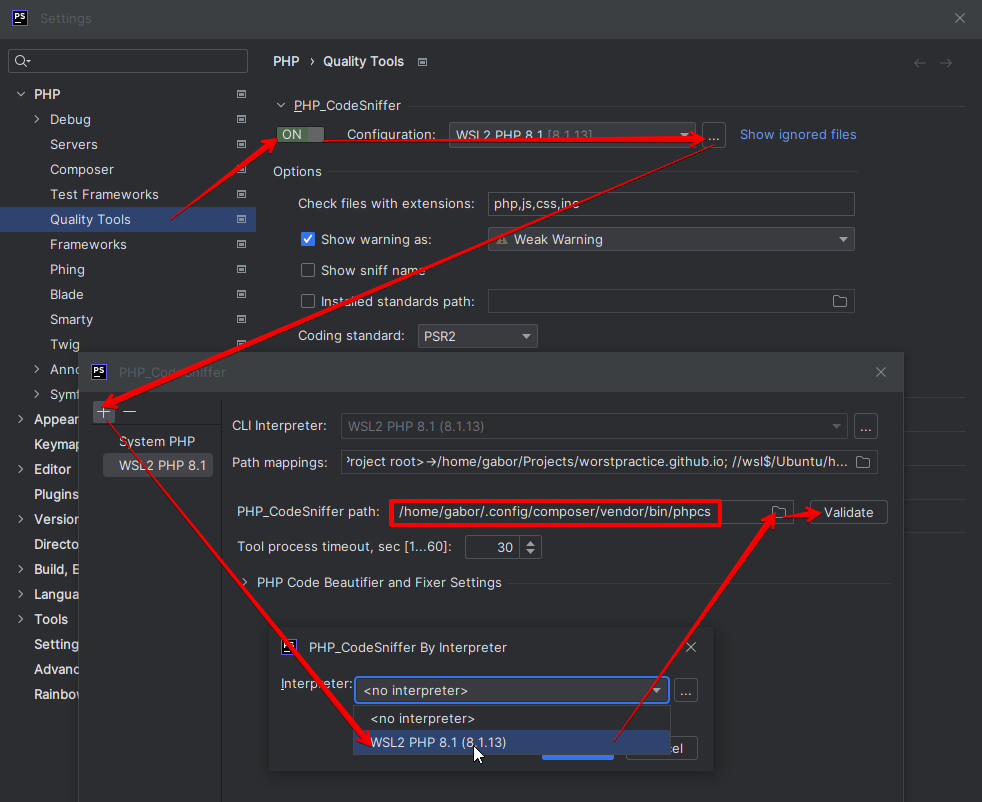
Set up the code quality tools
There are many settings in PHPStorm that can be set to be visible only for the actual project. Well, the quality tools are global settings, so if you set it specifically for one project, then it may (and most likely) not work for the other. Especially when you use remote/docker interpreter for them.
It can be also tricky to set remote interpreter (e.g. Docker) for them, because the IDE will periodically ping these tools to perform the quality check and if you are happen to be in the middle of an XDebug session in the same Docker machine, you can end up in a deadlock situation.
As once, I reported it to my colleagues:
In PHPStorm end any active debug session and turn off the XDebug listener before opening the Settings window. Edge case: if you land on an option that was set to use/listen/track the remote interpreter (the docker container) it may start checking the setup on the remote interpreter which is blocked by the active debug session, so the settings window is blocked from any further action. You won't be able to close the settings window to turn off the listener.
So if you go to Settings > PHP > Quality tools you will see the following tools listed:
- PHP_CodeSniffer
- PHP Mess Detector
- PHP CS Fixer
- Psalm
- PHPStan
These are not listed because we installed the corresponding composer packages. In fact, we installed these composer packages, because these settings are listed by default in PHPStorm.
Now we are in the right place, we have to do a bit of repetitive action, but we have to do it only once, and not for every project:
- Fold out the given tool’s options.
- Turn it
[On]. - Press the
...next to theConfiguration. - Press the
+button and choose our WSL interpreter from the popup dropdown. - Close the popup and press the
Verifybutton to… well… obviously verify
When you finished with all the tools, the checks will continuously bother you whenever you wrote not a spotless and modern code. Good luck with it!
But with this setup you can start working with PHP and WSL easier than ever before.